
When we bought this house, we saw this amazing space that most Floridians don’t have. A basement! Thankfully, our basement was finished and we already had ideas of how to use it. Thank you to the previous owner who left the not one, but two t.v. mounts in the same room to automatically claim that space as the “man cave.” The other room was free and I went ahead and claimed it as an art space. The only problem was that I didn’t want a a desk from Target or Walmart because they are seriously made of plywood with a cheap plastic wood. I have had my share of the Target cubies and desks, but I had all this wood lying around that needed to be used up.
One Saturday, Jordan had gotten home from his shift and needed some rest, so I headed down to the garage. Remember, we actually have a garage now instead of an apartment balcony and closet. Ha! There was all sorts of lumber that we literally carried and stored in the balcony closet of the apartment and then carried to the new house. These wood pieces were beautiful oak, cedar, pine and basswood. The problem was that I was seeing all of these amazing artists on Instagram that could take wood slices, create a tabletop pattern, and then stain it to perfection. I thought, “how hard could that be?” I quickly realized that the wood needs to be the same size in order to make all of those elaborate patterns. I was stuck with boards that were 9 inches across, 3 inches across or even 6 inches across. I also had another problem. A chopsaw can only chop 6 inch boards. That means I would have to make a slice on one side of the wider boards and then flip it to chop it on the other side.
I took the chopsaw off the shelf and set it on the floor and took prepared myself for many breaks to compensate for my little baby bump. I started adjusting the angle of the boards and started chopping. The tricky part was that I wanted a desk that would be 8 ft x 3 ft to fill in a cubby I had in that art room. While sitting on the floor, I tried chopping and piecing boards together, but the sizes made it automatically difficult to make it look reasonably decent. I had all of these gaps. Oh the gaps! Not only did I have gaps, but I had not started in the middle to make the pattern. That means I awaited the doom of making the pattern on the edges and then coming to a middle with no boards that would fit the space.
After making one side with a somewhat pattern and full of gaps, I decided to copy the same cuts on the other side, full of gaps. You are probably asking why I was freaking out about the gaps. With any type of purpose, you need the table top or desk to be smooth. In my case, I make huge signs and I don’t want them to get caught on every board and gap as I slide it down or reposition it. I have realized that Home Depot lumber departments lie because their boards are not always the length, width and height that say on the paper. That meant that my one inch boards could be one inch in height or 1.25 inches in height. Another unending problem.
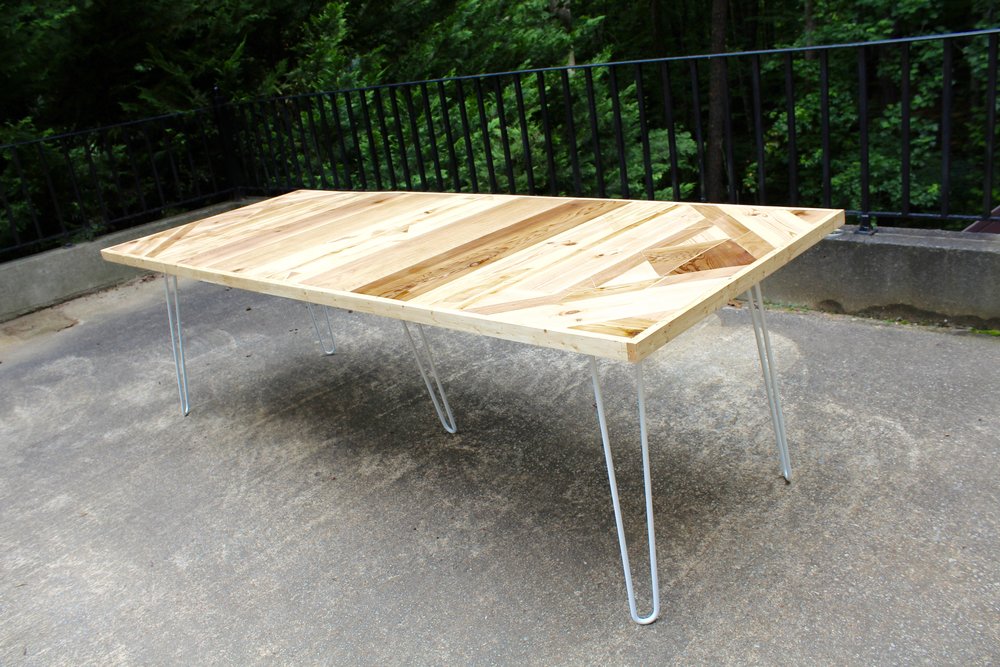
The only choice I had made (that I actually looked forward to) was getting some amazing hairpin legs for the desk. It didn’t matter it is was a desk full of gaps if it has some sweet legs to make up for it. Danny Cary is a talented friend of mine that created my logo and also makes logos for other companies. With small business in my background, I knew I would want to support a small business. A year ago, I saw Danny create this logo for “DIY Hairpin Legs.” They make these sturdy, steel hairpin legs that can withstand a lot of weight and look amazing. Not only are they steel, but they come in all these fun colors. Once I had pieced together all my random pieces of wood, I ordered the legs from DIY Hairpin Legs. They came to me packaged well and they were a breeze to put on. I ended up using 5, with 4 in the corners and one in the center for support. I thought about getting 6, but decided I didn’t want my legs bumping into the center bars while working. Once they were attached, I had another challenge.
I looked into many different options for making a smooth surface. I looked into buying a glass to slide over the top, but I didn’t have $800 I was willing to spare. I looked into putting a resin over the top, but I had no background with this technique. As a last resort, I decided on wood filler. We walked into Home Depot and I bought the largest container of wood filler I could find. Jordan and I started filling in the gaps with wood filler and my eyes were drawn to the fact that it was gooping out of the gaps with no clean lines to be seen. We let it dry and then the sanding began. I used a 40 grit sandpaper to sand it down at first and then went over it again with a high grit to smooth it out. The lower the grit, the more it will take off the wooden surface. Slowly but surely, I saw the uneven boards get to be one surface and only the wood filler between the gaps remaining. Those gaps were now filled with clean lines that were barely noticeable as you run your hand across the surface.
After days of my car being covered in sawdust, I went ahead and stained the wood. I could’ve gone with something darker, but I didn’t want to compromise the uniqueness of using all the different woods and the character each one gave to my desk. With the light stain/ poly done, I waited for it to dry. Within a days time, the desk was complete. It has turned out exactly as I had hoped. It had these beautiful shapes and combinations of wood, which I haven’t seen on any other desk you can find at the store. The oak grains were brought out and the various colors of cedar were highlighted with the stain I had chosen. As I ran my hand along the top of the surface, I couldn’t feel the gaps or the variations of heights anymore. It was a smooth as a granite surface. On the edges, you’ll notice most of the pattern and the middle having mostly straight boards. As your eyes move down to the bottom of the desk, you’ll see the simplicity of the white DIY Hairpin Legs. They created a sleek look to the rustic surface of the desk. I could’ve chosen another amazing color for the legs, but there is something elegant about white.
The truth is, I hope my woodworking skills increase with time and I can only hope to purchase some much needed woodworking tools that weren’t available to me at the time of making my desk. It has even occurred to me that this desk could eventually be used as a place for my little girl to do her homework. The fact is, that it means so much more when you can make something with your own hands. It may not be perfect at different stages along the way, but it is important that you just keep trying. Jordan will tell you that I wanted to give up once I saw all the gaps I was making. Encouragement goes a long way and I didn’t let a baby bump stand in the way of making this beautiful piece of furniture.

Be the first to comment